Newest Post

Tampilkan postingan dengan label Tutorial Adobe Photoshop. Tampilkan semua postingan

Manipulative Human Artwork with Particles and Flying Flower Petals in Photoshop

|
Baca selengkapnya »

Step 1

Create a new document 724px * 1024px with black background. We will prepare some ground texture first, so let’s load the Metal Texture into Photoshop and select a portion of it with the rectangular marquee tool:
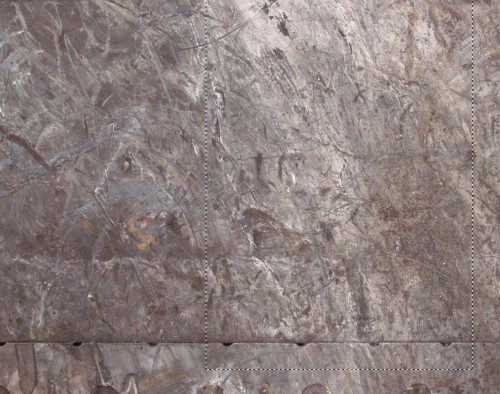
1 sel 
500x394 Manipulative Human Artwork with Particles and Flying Flower 
Petals in Photoshop
Copy and paste the selection over to our document, use the free transform tool to perspective this as shown below:
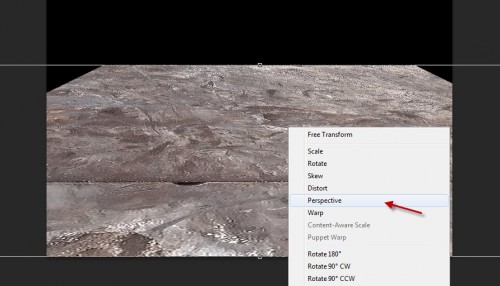
1 
persp 500x286 Manipulative Human Artwork with Particles and Flying 
Flower Petals in Photoshop
Then, use a soft eraser to remove the edges of the texture to create some depth:
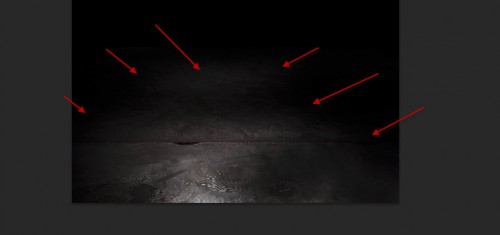
1 
eraser 500x235 Manipulative Human Artwork with Particles and Flying 
Flower Petals in Photoshop
Add the following 3 adjustment layers as clipping mask to this texture layer:
Black and White
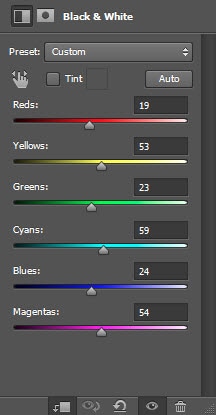
1 bw 
Manipulative Human Artwork with Particles and Flying Flower Petals in 
Photoshop
Levels
1 lv 
Manipulative Human Artwork with Particles and Flying Flower Petals in 
Photoshop
Layer mask on the levels adjustment layer:

1 
lv mask 495x700 Manipulative Human Artwork with Particles and Flying 
Flower Petals in Photoshop
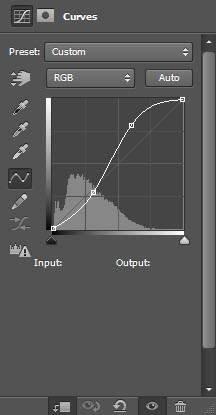
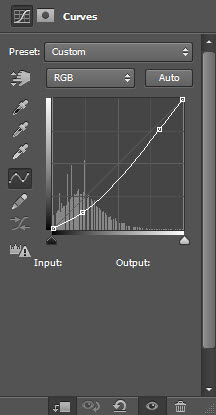
Curves
1 curves 
Manipulative Human Artwork with Particles and Flying Flower Petals in 
Photoshop
and you will have the following effect so far:

1 
effect 500x249 Manipulative Human Artwork with Particles and Flying 
Flower Petals in Photoshop

Step 2

Load the model image into Photoshop, and cut out the model as shown below, resize and place it above our ground texture:
2 paste 
Manipulative Human Artwork with Particles and Flying Flower Petals in 
Photoshop
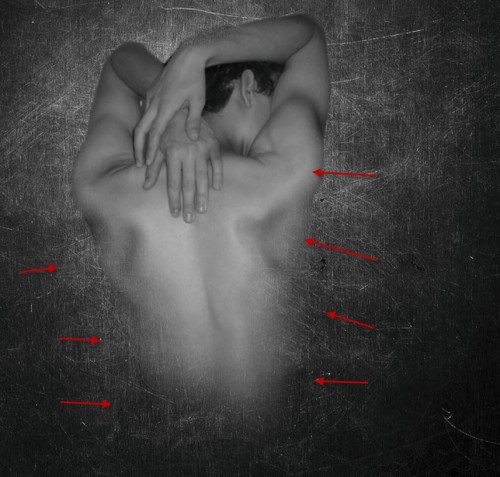
Tidy up the edges of the model with a soft eraser, as well as fade the lower body a bit so it blends into the background:
Hint: set the eraser tool’s flow and opacity to around 50% for a subtle effect.
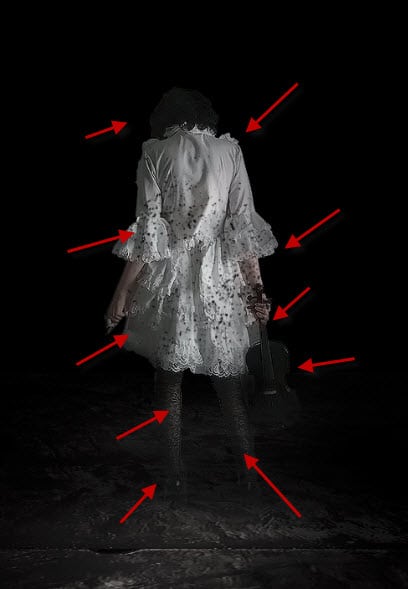
2 erase 
Manipulative Human Artwork with Particles and Flying Flower Petals in 
Photoshop
Add a levels adjustment layer as clipping mask to this model layer:
2 lves 
Manipulative Human Artwork with Particles and Flying Flower Petals in 
Photoshop
Attach the following layer mask on this levels adjustment layer:
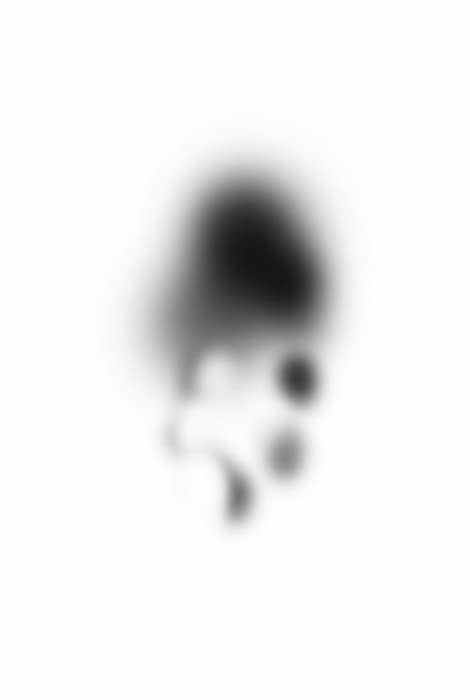
2 lvs 
470x700 Manipulative Human Artwork with Particles and Flying Flower 
Petals in Photoshop
and here is the effect so far:
2 effect 
Manipulative Human Artwork with Particles and Flying Flower Petals in 
Photoshop

Step 3

The hair looks a bit boring in my opinion so I decided to draw some instead. Create a a new layer and draw a path with the Pen Tool:
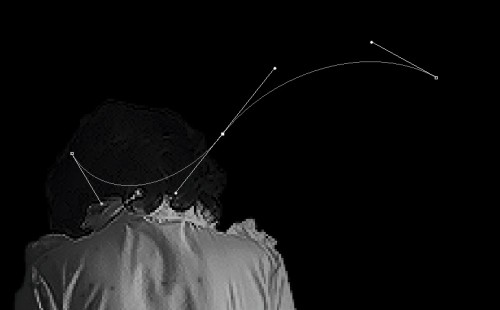
3 
stroke 500x310 Manipulative Human Artwork with Particles and Flying 
Flower Petals in Photoshop
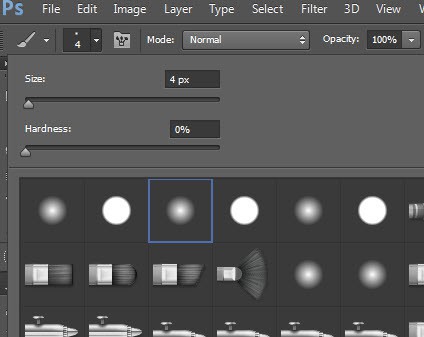
Choose a 4px hard brush:
3 brush 
Manipulative Human Artwork with Particles and Flying Flower Petals in 
Photoshop
Go back to Pen Tool and Right-click on the Path, choose “Stroke Path”:
3 path
 500x394 Manipulative Human Artwork with Particles and Flying Flower 
Petals in Photoshop
Stroke the path with this brush, and turn on “Simulate Pressure”:
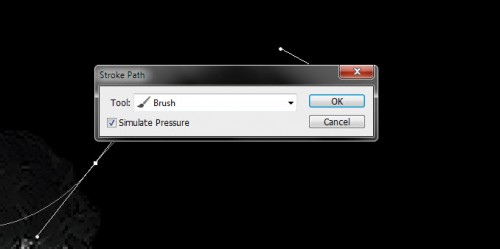
3 stroke path setting 500x249 Manipulative Human Artwork with 
Particles and Flying Flower Petals in Photoshop
and you will have the following effect:
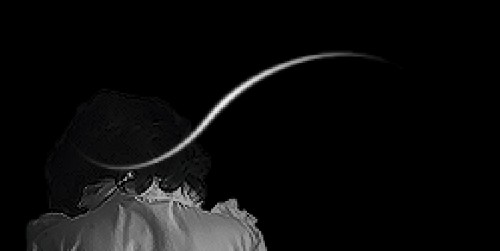
3 
effect 500x251 Manipulative Human Artwork with Particles and Flying 
Flower Petals in Photoshop
I repeated this above steps many times and adjusted the shapes, size and colour of the hair, and I have the following effect as a result:
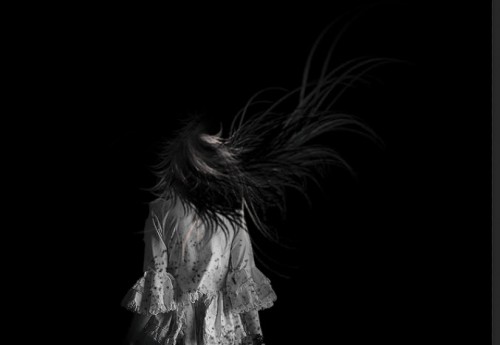
3 
effect 2 500x345 Manipulative Human Artwork with Particles and Flying 
Flower Petals in Photoshop
This can be a lengthy process so be patient :) If you have difficulty with this step, check out this video tutorial I have on the PSDVault Youtube Channel:

Step 4

We can now paint or render some cloud over the background with either a cloud brush, or cloud filter, make sure you adjust the layer opacity to a low value to ensure we only have a subtle effect:
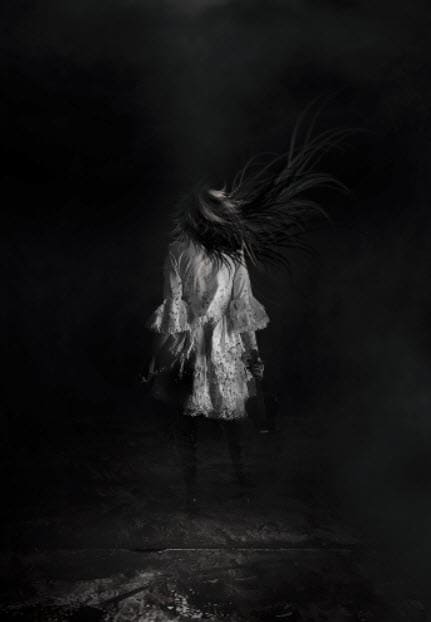
4 cloud 
Manipulative Human Artwork with Particles and Flying Flower Petals in 
Photoshop
We can add some particles around the model – once again we utilise the metal texture and select a piece from it:
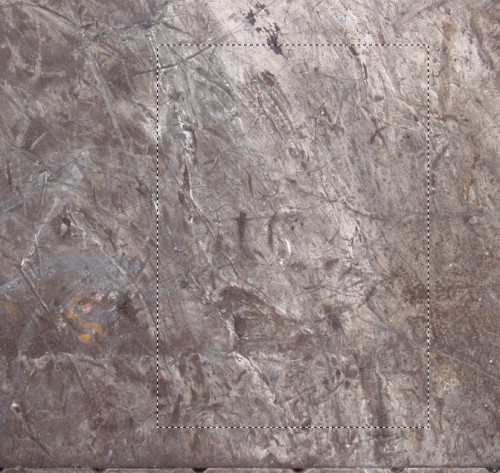
4 sel 
500x473 Manipulative Human Artwork with Particles and Flying Flower 
Petals in Photoshop
Copy and paste the selection over to our document and place the layer below the model layer, add the following 2 adjustment layers as clipping mask to it:
Black and White
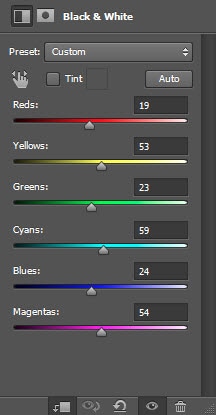
4 bw 
Manipulative Human Artwork with Particles and Flying Flower Petals in 
Photoshop
Levels
4 lv 
Manipulative Human Artwork with Particles and Flying Flower Petals in 
Photoshop
Warp this particle layer so it forms a flying shape:
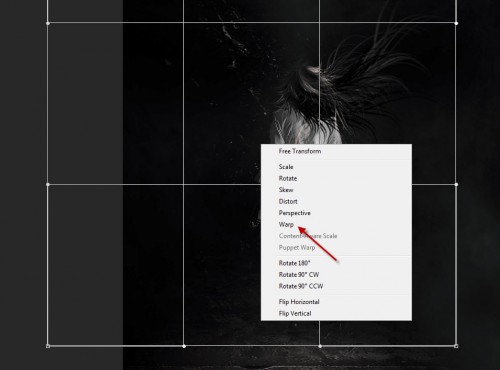
4 warp
 500x370 Manipulative Human Artwork with Particles and Flying Flower 
Petals in Photoshop
and here is the effect you will have:
4 effect 
Manipulative Human Artwork with Particles and Flying Flower Petals in 
Photoshop
Repeat the above steps and add some flying particles to the right hand side as well:
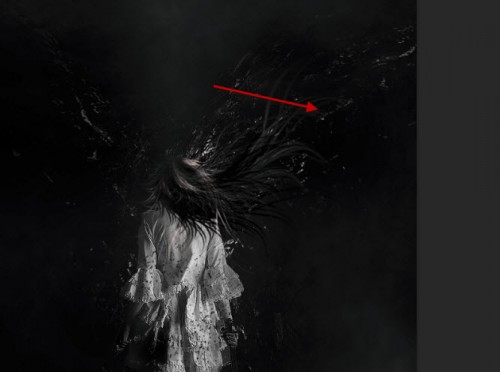
4 
rotate 500x372 Manipulative Human Artwork with Particles and Flying 
Flower Petals in Photoshop

Step 5

OK we can now make a new brushset for painting the flying flower petals, create a new document (size doesn’t really matter), create a new layer and paint a single dot:
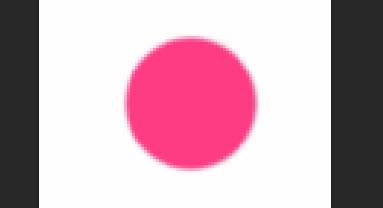
5 paint 
Manipulative Human Artwork with Particles and Flying Flower Petals in 
Photoshop
Warp this dot into a petal shape with the warp tool:
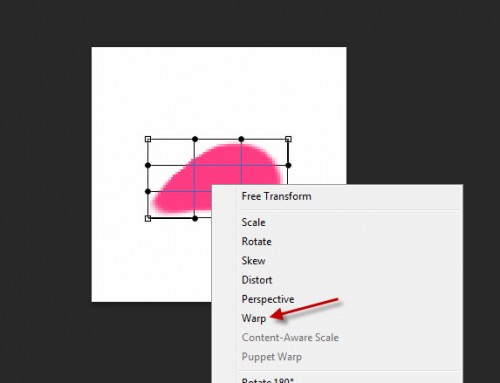
5 warp
 500x383 Manipulative Human Artwork with Particles and Flying Flower 
Petals in Photoshop
Then hide the background layer, go to Image > Trim and trim out the transparent pixels, then go to Edit > Define brush preset:
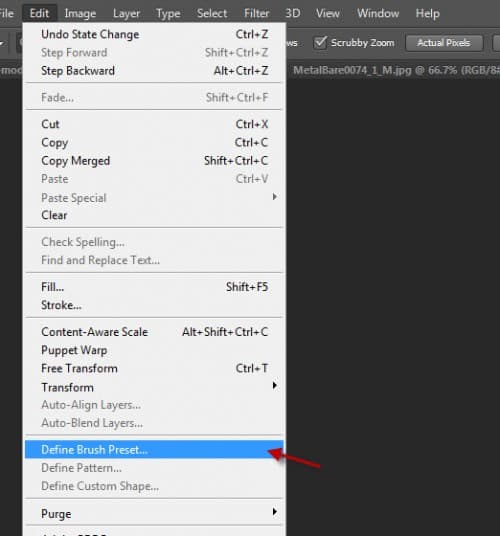
5 define brush 500x536 Manipulative Human Artwork with Particles 
and Flying Flower Petals in Photoshop
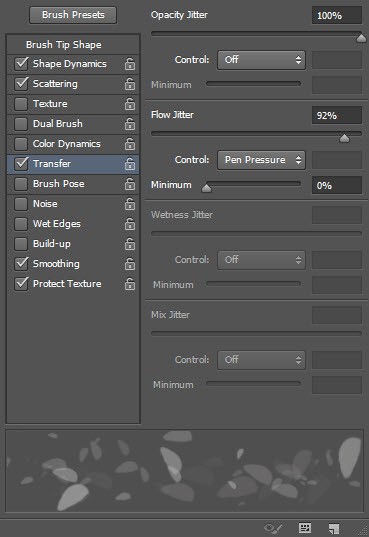
Give the brush a name, and go the brushes windows and apply the following settings:
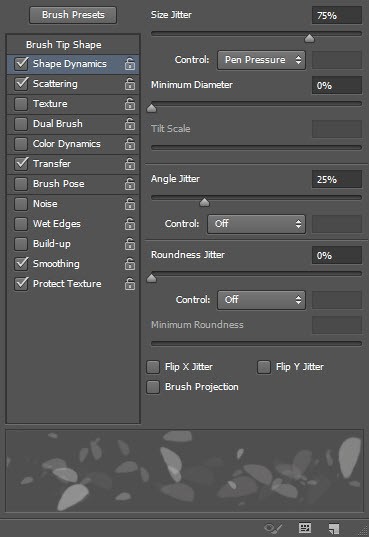
5 shape dynamics Manipulative Human Artwork with Particles and 
Flying Flower Petals in Photoshop
5 
scattering Manipulative Human Artwork with Particles and Flying Flower 
Petals in Photoshop
5 transfer
 Manipulative Human Artwork with Particles and Flying Flower Petals in 
Photoshop
Use this brush to paint the flower petals according to the flying Hair path:
5 paint flower 500x440 Manipulative Human Artwork with Particles 
and Flying Flower Petals in Photoshop
and you will have the following effect so far:
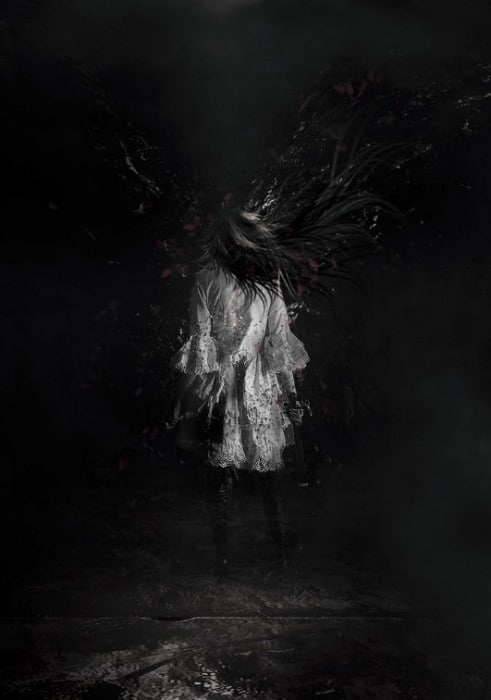
5 
effect 491x700 Manipulative Human Artwork with Particles and Flying 
Flower Petals in Photoshop
I further added some colour adjustments over the image, and you will have the following final effect: (click to enlarge)
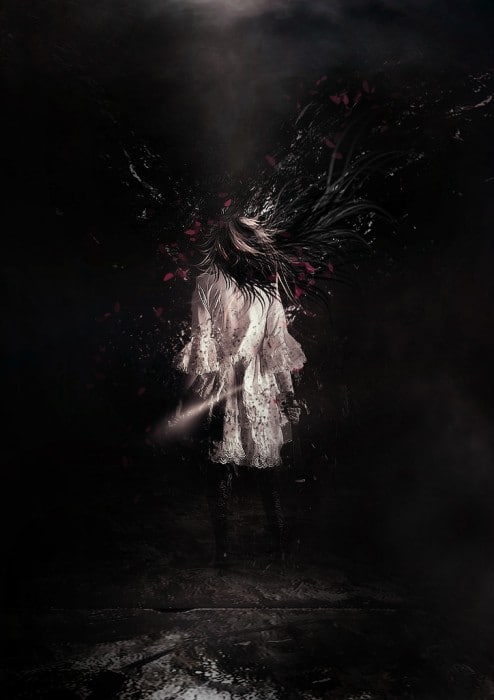
grungy model flatten 2 494x700 Manipulative Human Artwork with 
Particles and Flying Flower Petals in Photoshop
That’s it for this tutorial! Hope you enjoy it and find it useful! Till next time, have a great day!

Create a Tangled, Horror Cracked Figure with Layer Masking Techniques in Photoshop

|
Baca selengkapnya »
In this tutorial, I will show you the steps I took to Create a Horror Cracked Human Figure with Layer Masking Techniques in Photoshop. The primary goal of this tutorial is to show you how you can blend textures together with layer mask, and how to achieve the best end result possible.
We will also go through other skills such as image adjustments, layer blending, selection tools and some simple photo retouches.
This is an intermediate level Photoshop tutorial so some steps can be tricky.
Note: The Photoshop tutorial is done in CS6 – therefore some screenshot may have slighting different layout as in the earlier version.
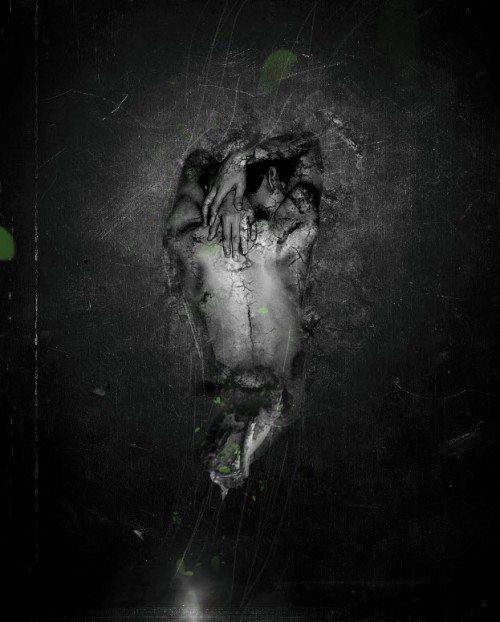
Here is a preview of the final effect I have for this tutorial: (click to enlarge)
crack model flatten 2 500x618 Create a Tangled, Horror Cracked 
Figure with Layer Masking Techniques in Photoshop

Step 1

Load the Metal background image into Photoshop – we will use it as our canvas. Duplicate the background layer and apply the following unsharp mask filter to it in order to bring out a bit more details:
1 
unsharp 500x353 Create a Tangled, Horror Cracked Figure with Layer 
Masking Techniques in Photoshop
Add the following 2 image adjustment layers to this background layer:
Levels
1 prop Create a
 Tangled, Horror Cracked Figure with Layer Masking Techniques in 
Photoshop
Layer mask on the levels adjustment layer:
1 mask
 500x620 Create a Tangled, Horror Cracked Figure with Layer Masking 
Techniques in Photoshop
Curves
1 curves1 
Create a Tangled, Horror Cracked Figure with Layer Masking Techniques in
 Photoshop
and here is the effect so far:
1 
effect1 500x620 Create a Tangled, Horror Cracked Figure with Layer 
Masking Techniques in Photoshop

Step 2

Load the model image into Photoshop and cut of the model from its background, paste it onto our document. Resize and position it to the centre of the canvas:
2 
paste1 500x540 Create a Tangled, Horror Cracked Figure with Layer 
Masking Techniques in Photoshop
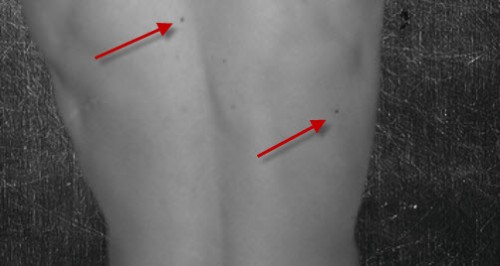
Then use the spot healing tool to clean out some dark spots as shown below:
2 spot healing Create a Tangled, Horror Cracked Figure with Layer 
Masking Techniques in Photoshop
2 spot
 500x355 Create a Tangled, Horror Cracked Figure with Layer Masking 
Techniques in Photoshop
2 
spot 2 500x266 Create a Tangled, Horror Cracked Figure with Layer 
Masking Techniques in Photoshop
Use a soft erase tool to fade the edges of the model so it blends into the background:
2 fade
 500x477 Create a Tangled, Horror Cracked Figure with Layer Masking 
Techniques in Photoshop

Step 3

We can add the following 2 image adjustment layers this model layer as clipping mask:
Levels
3 levels 
Create a Tangled, Horror Cracked Figure with Layer Masking Techniques in
 Photoshop
Curves
3 curves 
Create a Tangled, Horror Cracked Figure with Layer Masking Techniques in
 Photoshop
and here is the effect so far:
3 
effect1 500x635 Create a Tangled, Horror Cracked Figure with Layer 
Masking Techniques in Photoshop

Step 4

We can now add the crack texture onto the model – load the crack image into Photoshop and use the Lasso Tool to select a portion of texture:
4 
lasso 500x429 Create a Tangled, Horror Cracked Figure with Layer Masking
 Techniques in Photoshop
Copy and paste the selection onto our document and set it as a clipping mask to the layer below, use a soft eraser  (set flow and opacity to around 60%) to remove some parts of the texture as shown below:
Hint: this effect can be a bit tricky achieve, you should try adjust the flow and opacity of the eraser tool as you see it, until parts of the body is reveal and not covered by cracks.
4 
erase 500x545 Create a Tangled, Horror Cracked Figure with Layer Masking
 Techniques in Photoshop
Again we add the following 2 adjustment layer as clipping mask for this cracked texture layer:
Black and White
4 bw1 Create a 
Tangled, Horror Cracked Figure with Layer Masking Techniques in 
Photoshop
Levels
4 lvs Create a 
Tangled, Horror Cracked Figure with Layer Masking Techniques in 
Photoshop
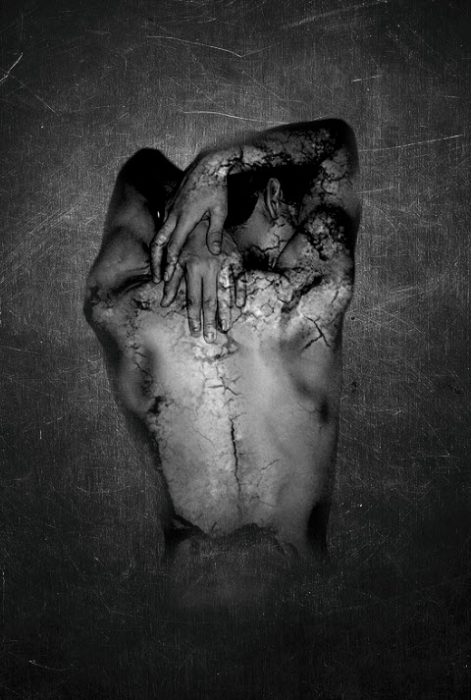
and you will have the following effect so far:
4 
effect1 471x700 Create a Tangled, Horror Cracked Figure with Layer 
Masking Techniques in Photoshop

Step 5

We will add some further crack texture around the model, so go back to the cracked image and select another piece of it, copy and paste the selection over onto our document, de-saturate its colour:
5 
paste 500x580 Create a Tangled, Horror Cracked Figure with Layer Masking
 Techniques in Photoshop
I applied the following layer mask to this new cracked texture layer to hide some of it:
5 mask
 500x568 Create a Tangled, Horror Cracked Figure with Layer Masking 
Techniques in Photoshop
Add the following 2 adjustment layers to this new crack layer as clipping mask:
Levels
5 lvs Create a 
Tangled, Horror Cracked Figure with Layer Masking Techniques in 
Photoshop
Curves
5 curves 
Create a Tangled, Horror Cracked Figure with Layer Masking Techniques in
 Photoshop
and you will have the following effect so far:
5 
effect1 500x589 Create a Tangled, Horror Cracked Figure with Layer 
Masking Techniques in Photoshop
Reduce the layer opacity of the new cracked texture slightly down to around 90% for a subtle effect:
5 
effect 2 500x670 Create a Tangled, Horror Cracked Figure with Layer 
Masking Techniques in Photoshop

Step 6

I decided to add something under the model for some extra effect. So I loaded the tree root image into Photoshop and select a piece of the roots with the quick selection tool:
6 roots 
Create a Tangled, Horror Cracked Figure with Layer Masking Techniques in
 Photoshop
Copy and paste the selection onto our document, resize and place it under the body, add the following layer mask to it to soften its edges:
6 mask Create a
 Tangled, Horror Cracked Figure with Layer Masking Techniques in 
Photoshop
Add the following 2 adjustment layers as clipping mask to this root layer:
Black and white
6 bw Create a 
Tangled, Horror Cracked Figure with Layer Masking Techniques in 
Photoshop
Levels
6 lvs Create a 
Tangled, Horror Cracked Figure with Layer Masking Techniques in 
Photoshop
and you will have the following effect so far:
6 
effect 500x273 Create a Tangled, Horror Cracked Figure with Layer 
Masking Techniques in Photoshop

Step 7

We’re almost done! For some final touches, I rendered some cloud down the bottom of the canvas:
7 
cloud 500x282 Create a Tangled, Horror Cracked Figure with Layer Masking
 Techniques in Photoshop
I also used the brush created in Step 5 of this tutorial to added a few leaves around the model:
7 
leaves 500x541 Create a Tangled, Horror Cracked Figure with Layer 
Masking Techniques in Photoshop
I also used a 2px hard brush to paint some lines around the model for some dramatised tangling effect:
7 
effect 500x622 Create a Tangled, Horror Cracked Figure with Layer 
Masking Techniques in Photoshop
I further added some colour adjustments over the image, and you will have the following final effect: (click to enlarge)
crack model flatten 2 500x618 Create a Tangled, Horror Cracked 
Figure with Layer Masking Techniques in Photoshop
That’s it for this tutorial! Hope you enjoy it and find it useful! Till next time, have a great day!

Prev
▲Top▲